|
|
网站:http://www.skyfirelasers.com/boomdog/byoshowbasic.php
Guide to Basic Laser Effects
Just purchase a new laser and trying to figure out how to make it do some pretty cool and simple effects? You've come to the right place. Many of these effects are demonstrated in the video gallery (please check poor-man scanners and the spirograph). We're just going to jump right in with some basic ideas you can run with.
Interested in a 5% discount on Wicked Lasers products and wish to contribute to this website? Click below to use my referral code
Jump to:
Linear Diffraction Gratings
2-axis Diffraction Gratings
Quick Beam Splitter
Tunnel Scanner
Liquid Sky Scanner
Spirograph
Linear Diffraction Gratings
Diffraction is an incredible characteristic of light, and if you don't know much about it, it is definitely worth your interest. If you get a chance, search the web for diffraction, or go to Wikipedia, which is an excellent source for any information you need.
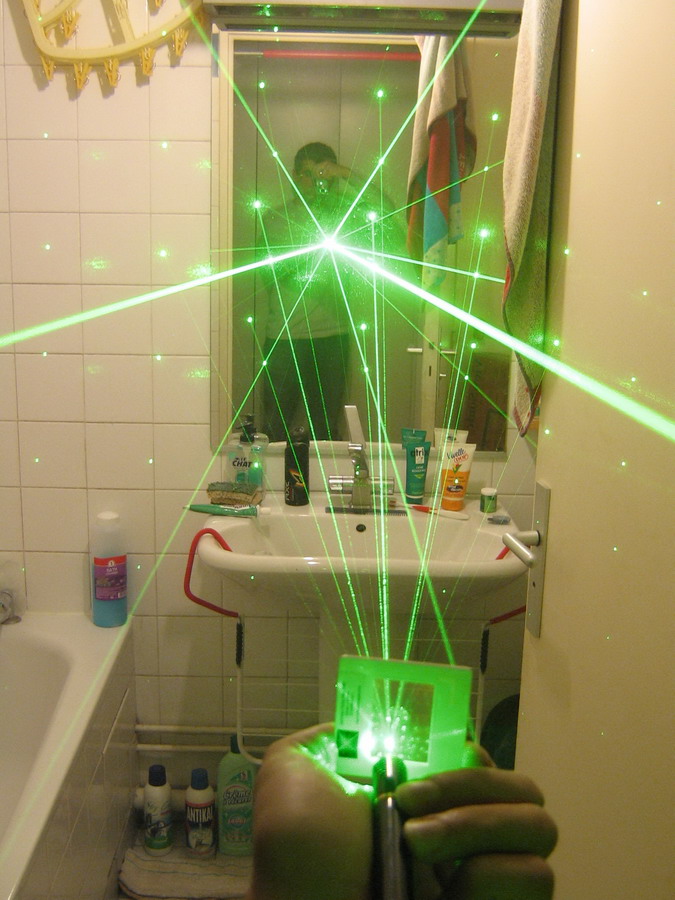
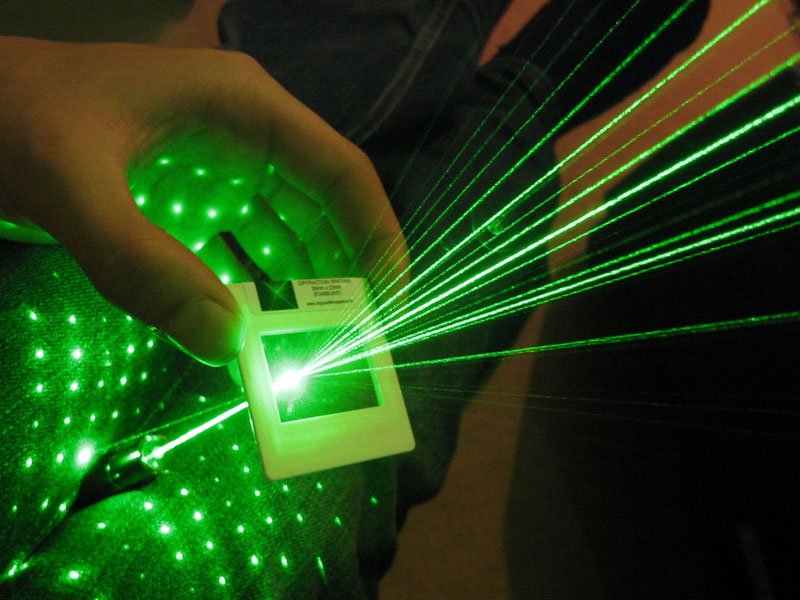
An important tool during the study of diffraction is the diffraction grating. A diffraction grating is most often a seemingly clear film that has hundreds or thousands of lines per millimeter, all parallel to each other. Sometimes diffraction mirrors can be found, which in essence are mirrors with this film on top or etched in them. Assuming you now know what diffraction is (you searched for it, right?) you would understand that the light shines through the lines, and begins to cancel itself out at almost entirely except for a few maximas because of interference. Ok enough science talk. How can you use it in your show? This is how:
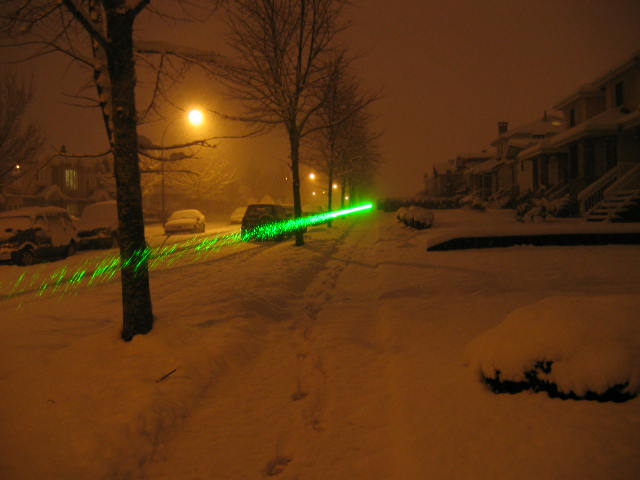
This is a 1000 lines/mm diffraction grating from www.sciencestuff.com
1
The laser, firing from the left, hits the diffraction grating and splits into different beams. Depending on the lines/mm and the color laser that you use, you can get many beams or simply 3, as the picture above is. These are very simple effects, however they are not perfect as the more beams you move to the side, the dimmer each one will get. Each beam away from center is about 5-20% of the intensity of the last beam. Definitely a fun tool, but this is not how professional laser shows make separate beams.
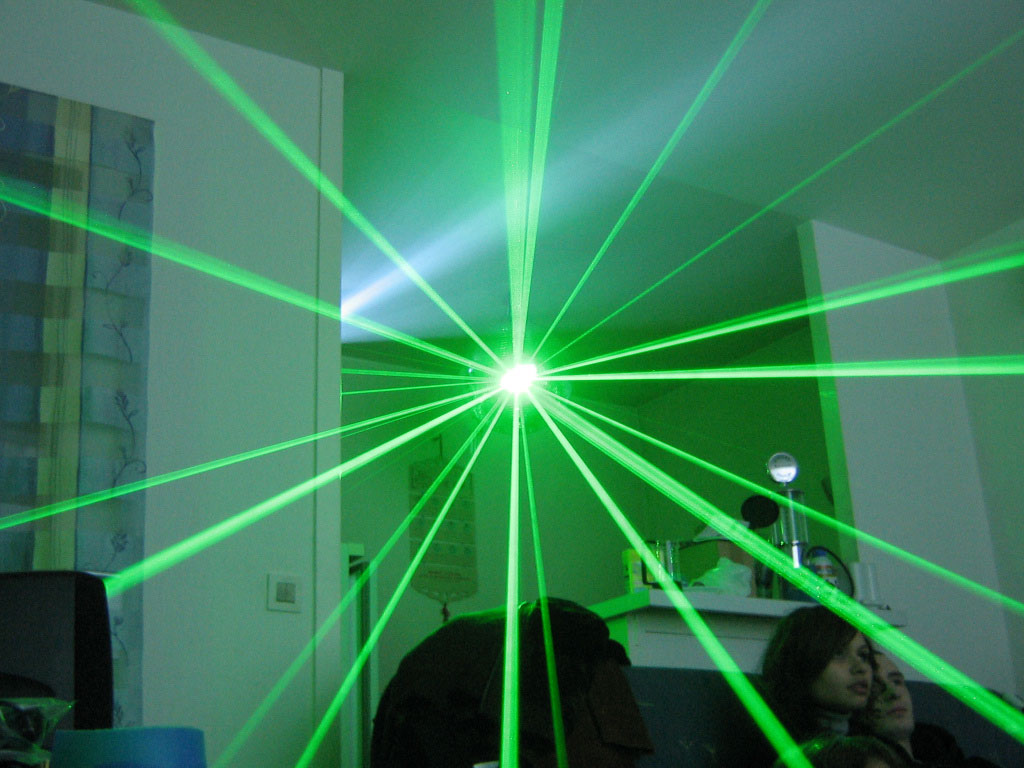
2-axis Diffraction Gratings
These work in the same exact way as the linear diffraction gratings, only the microscopic lines are both parallel and perpendicular to each other, forming a grid. This provides a second axis of diffraction as shown below:
2
This is actually a lens from those cheap "rainbow glasses" often handed out free at fireworks shows. You can also achieve the same effect by taking two linear diffraction gratings and overlapping one rotated 90-degrees to the other. Again, these aren't used in professional shows for the sake that the beams whither away rather quickly.
Quick Beam Splitter
3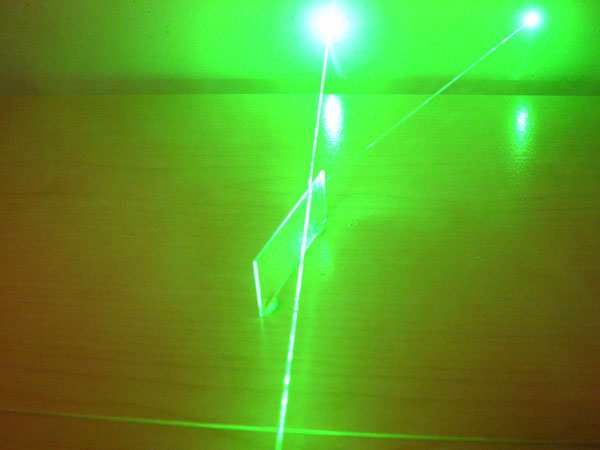
This is not really an effect, but more of a technique in case you want to run two or more effects at once. Grab a thin, small pane of glass, and angle it to almost parallel to your beam. Microscope slides work very well for a makeshift splitter.
Professional beam splitters are normally cubes (shown elsewhere on this site) as there is a slight problem of double beams from internal reflection (Figure 1) but for your purposes it should do just fine.
4
Figure 1. Beam splitter types.
Diagram from The Laser Cookbook, 88 Practical Projects, Gordon McComb
Tunnel Scanner
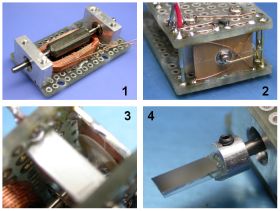
This is a fun and easy scanner that often provides very impressive results. Tunnels are created by making the beam spin around itself many times in the air. In order to do this, you will need a mirror and a motor. The motor can be anything that spins: a stand-alone motor, a computer fan, a cd-spinner, anything that rotates quickly. Small mirrors can often be purchased at arts and crafts stores. For best results, use front-side (sometimes called first-side) mirrors, which have the reflective foil on the front of the mirror instead of behind glass, where secondary reflections can occur. Front-side mirrors can be purchased at various places online.
While constructing scanners, wear goggles until you are sure that the mirrors will not fly off the motors!
To build the scanner, all you need to do is attach this mirror at a slight angle on top of the axle. This causes the laser to change angle and create the "tunnel" effect.
I prefer using a motor with a surface. Since I have a ton of computer fans, it is very easy for me to just superglue a piece of wire onto the side of the center of the fan (to create a wedge) and then glue down the mirror. Computer fans are powered by 5-12v, depending on the speed you want. Some have 3 wires (Red, Yellow, and Black) while others only have 2 (Red and Black). If yours has 3, tie the red and yellow together. Then, merely hook red up to the positive end of a supply between 5v and 12v. Hook the black up to the negative or ground end.
If you choose to use a straight motor, drill out the center of a penny to create that flat surface. From there you can mount the mirror with superglue. Thanks to Gadgeteer for the idea. Wire conventions are often the same as the computer fan, but the voltages will probably be different. If you don't know what voltages your motor requires, start low, at 1.5v, and work your way up until it gets to an adequate speed.
5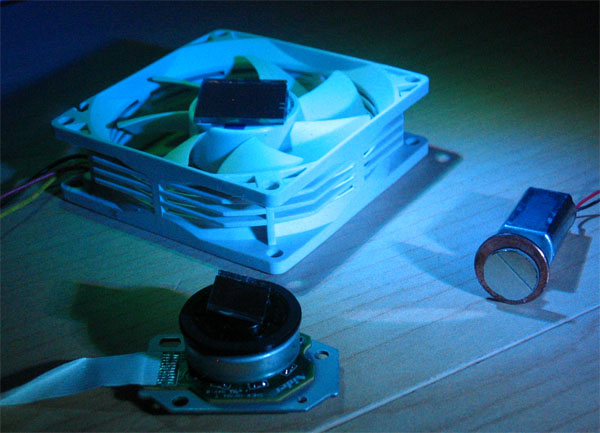
Clockwise from top: Computer fan scanner, straight motor with penny, CD-ROM motor.
6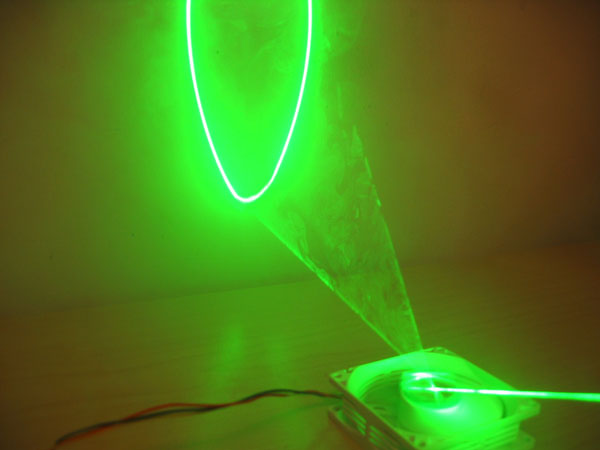
Fan Scanner
Liquid Sky Scanner
This is probably the single hardest scanner to build, only because if you are sloppy it is not going to look right and the effect could be lost. Liquid sky is the term for a laser that is being shot on the same level over and over again, making almost what seems like a surface spreading out from the scanner. These are very easy to do with galvos and professional gear, but building one out of scrap is difficult because the beam needs to always move in relatively the same place.
In order to build a liquid sky scanner, you will need a motor and a number of mirrors. Any of the above ideas for motors apply here too. However, you may not be happy with your first, second, or even third results, so buy lots of cheapo mirrors.
To achieve the effect, you will need these mirrors rotating around the axle with the reflective surface pointing outwards (see the pictures below). The more mirrored sides you have, the brighter and more condensed your sky will be. Unfortunately, more mirrors also means more possibilities of not getting the lines produced to overlap. Every time a mirror moves into the beam, it will create a distinct line, but if every mirror isn't at the same exact angle, you will get multiple lines. It still creates the effect, but multiple lines tend to just light up the smoke, instead of creating a distinct layer.
If you wish to make one with only 2 mirrors, glue one mirror straight up onto your motor, and then glue the second, making sure that they are both pressed together firmly. The reason you don't glue them together before is that you want to ensure that the mirrors edges line up at the bottom. In order for this to work, you need to ensure that the mirrors are not tilted forward or backward in any way.
If you wish to make one with more than 2 mirrors, you will need a hexagonal or octagonal shape. I find that a large nut purchased at any hardware store works well. Make sure to clean all of the edges, and then glue on your mirrors, again making sure that they are as flat as possible against the edges of the nut. Then glue the nut to the motor, and apply the appropriate voltages (mentioned in tunnel scanners above).
7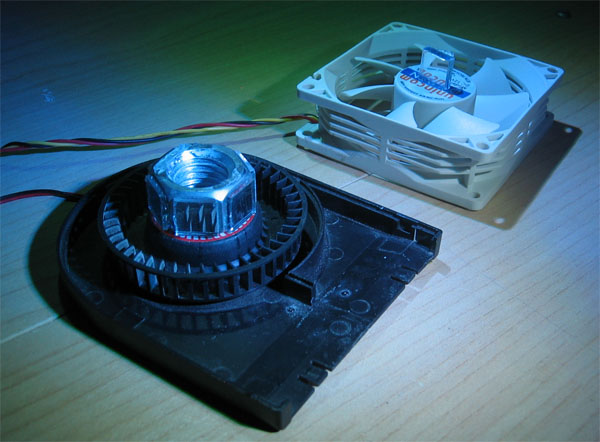
Computer-fan mounted 6-side scanner and 2-side scanner.
8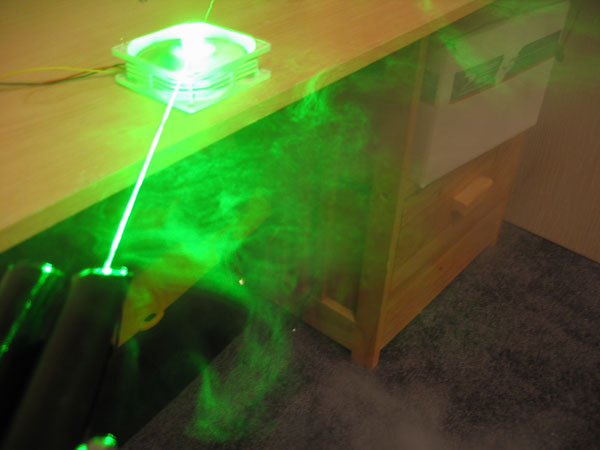
Liquid Sky is better seen in action than in photographs. Here is a video of one of the scanners over some steaming chicken.
The Spirograph
Now this sucker is fun, and relatively simple. You will need 3 tunnel scanners that barely have any tilt on the mirrors at all. This is very important because we don't want the beam to expand very quickly. After you have built these three (you should have to look hard in order to noticed a tilt, that's how little there needs to be), then align them like in Figure 2.
Figure 2
9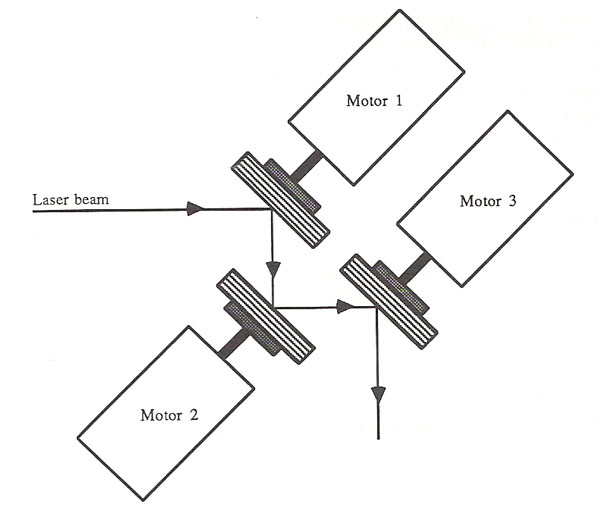
Diagram from The Laser Cookbook, 88 Practical Projects, Gordon McComb
Alignment is the hardest part. Run all three of the mirrors at a low speed. Then, adjust the laser so that you see a dot in the center of motor 1, and ensure that the wobbly circle in motor 3 is still within the entire mirror. If it is too big, this means you have too much of an angle on your mirrors, and have to start over. If you just can't get it to fit on there, mess with the angle of the laser (both horizontally and vertically) until everything fits. It will probably take you a few minutes.
10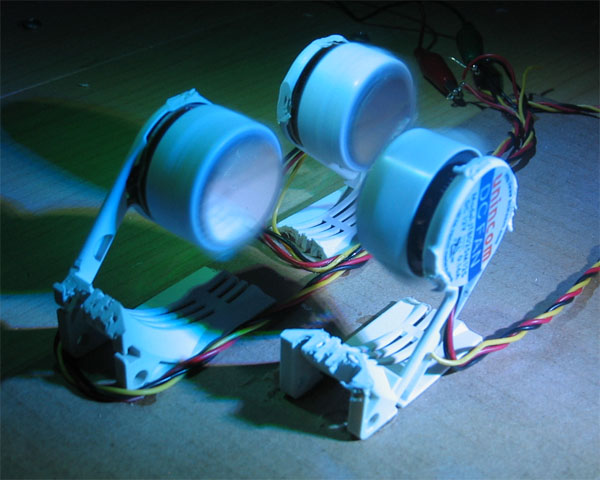
Now the fun part about spirographs is that this is the first scanner you have made that is adjustable. You can install potentiometers on your motors, or even slow them down with your fingers (if it's safe; don't try to slow down a square mirror spinning at 2500rpm!). It creates a bunch of different patterns. Check out the video below!
11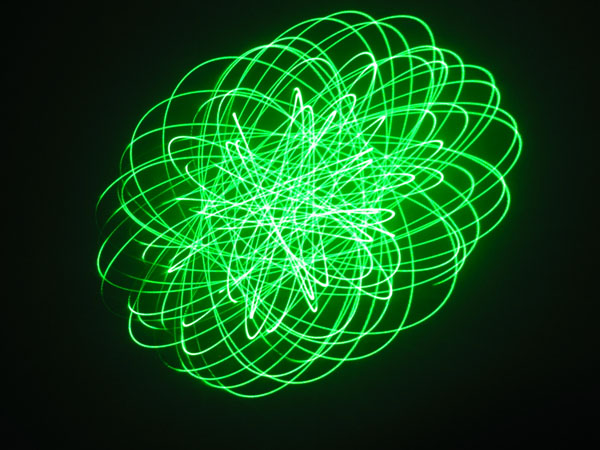
Slow-shutter shot of the spirograph effect
You really just have to see it. The Spirograph! |
|


 发表于 2008-1-24 20:51:20
 发表于 2008-1-25 13:46:46